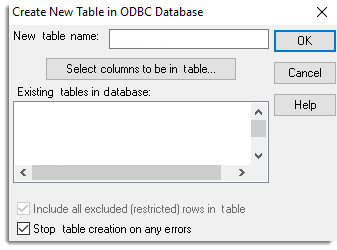
Select menu: Spread | Export | Create Database Table
This menu allows a user to add a spreadsheet into an ODBC database as a new table. The column attributes for the table (Text, Numerical, Date) will be taken from the spreadsheet column attributes.
- From the menu select Spread | Export | Create Database Table.

On first using this dialog, you will need to select an ODBC data source using the Select Data Source dialog. How to select an ODBC database to add the table to is covered in the topic ODBC Databases. This operation can also be performed with the DBEXPORT command.
New table name
This is the name for the new table in the Database. The table must not already exist in the database, but if it does you will be asked if you want to insert the spreadsheet as a set of new rows in the existing table (unless Stop table creation on any errors is selected).
In general, table names should just use letters (A-Z,a-Z) and numbers (0-9) and the underscore (_) symbol. There may be a further restriction on their length (e.g. 10 for a dBase database) or the first character in the name may not be allowed to be a number. The table name may have to include a schema if the Database uses a schema or catalogue (e.g. to create a table FIELDS in the FARMS catalogue, the new table name would be given as FARMS.FIELDS). See your Database specifications for details of exactly what is allowed in the database you are using.
Select columns to be in table
This opens the Select Columns dialog that can be used to specify a subset of columns in the spreadsheet to be added into the table.
Existing tables in database
This list is just provided for informational details. Double clicking a table in the list will provide a brief pop-up note on the columns that the table contains.
Inserting all excluded (restricted) rows into table
If a filter or restriction is active in the spreadsheet, selecting this option will add all the rows into the table, otherwise the excluded rows will not be added to the table.
Stop table creation on any errors
If any error occurs then the export to the database will be terminated, otherwise as much of the process as possible will be completed. For example, if missing values are not allowed in the table columns, the export would be stopped on the first missing value encountered, otherwise if these non-fatal errors were ignored, all rows with non-missing values would be successfully added.
See also
ODBC Databases
SQL Statements
Create Multiple Tables in Database
ODBC Data Query – Select Data
Insert Spreadsheet into Database
Merge Spreadsheet into Database
Run ODBC Export Link (GLK) file
Using ODBC with 64bit Windows
DBIMPORT procedure
The DBEXPORT procedure provides this functionality within the command language.