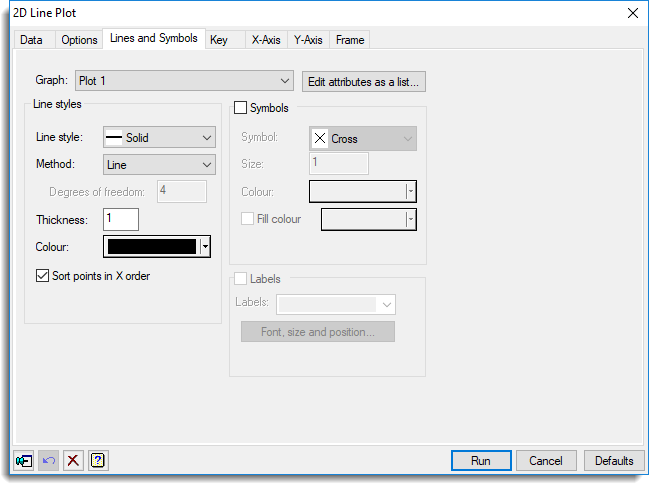
Use this to set the line and/or symbols for 2D or 3D scatter plots, polar plots and spiderweb/star plots. For spiderweb/star plots only the line colours can be set for each group.

Graph
Lists the current plot for you to specify the line or symbol attributes. If groups have been specified on the data menu then these will be shown in the list for each graph. The groups are represented by the ordinal values and you can then set line/symbol attributes for each different level of the group.
Edit attributes as a list
This opens the Graphics Line and Symbol attributes dialog which allows the line and symbol attributes to be edited in a list, enabling easier access to multiple plots at once.
Line styles
Lets you control the line styles for a 2D Line plot, 2D Line & Scatter Plot, 3D Scatter Plot and Polar Plot.
Line style
Lists the different line styles that can be used for each graph type. Select the line style that you want to use.
Method
Specifies how the line is to drawn through the plotted points. You can either select line to draw straight lines or monotonic, open and closed to draw smoothed curves. The monotonic setting specifies that a smooth single-valued curve is to be drawn through the data points. The name is derived from the requirement that the x-values (rather than the fitted curve) must be strictly monotonic, so that there is only one y-value for each distinct x-value. To ensure this, a copy of the data is made and sorted before the curve is fitted. This setting is recommended for plotting curves fitted to data. You should ensure that the points are close enough for the plotted line to be a reasonable approximation.
When you know the functional form of the curve, it may be advantageous to calculate extra points. The open and closed settings specify that a smooth, possibly multi-valued, curve is to be drawn through the data points; the resulting curve is rotationally invariant, although not invariant under scaling. The closed setting connects the last point to the first. The open or closed methods are more suited to the situation where the plotted curve is intended to represent the shape of an object. The Spline setting plots a smoothing spline fitted through the points. By default four degrees of freedom are used in the spline, however, you can change this by supplying another values in the Degrees of freedom option. The Spline setting is not available for Polar plots.
Thickness
Lets you specify an amount by which the standard thickness of the plotted lines are to be multiplied by. The value 1 represents the standard thickness used.
Colour
Lets you specify the colour of the line. Select the colour you want to use for the graph.
Apply to all plots
These buttons open a dialog where the current attributes within the associated group box (Lines, Symbols or Labels) can be applied to all the plots. In the dialog select the check boxes of the attributes you want to apply to all plots.
Sort points in X order
If selected, the data will be sorted so the X values are in ascending order prior to plotting. This ensures correct appearance of fitted lines, for example, regardless of the order in which data are recorded or stored. On the other hand, some lines may need to be plotted in the order in which the values are given, for example when drawing the outline of a polygon. This option is not applicable to 3D Graphs – it is assumed the data are ordered correctly.
Symbols
Lets you control the size, style and colour of symbols for a 2D Scatter plot, 2D Line & Scatter Plot, 3D Scatter Plot and Polar Plot.
Symbol
Lists the different symbols that you can use to represent the points in the graph. Select the type of symbol you want to use for the graph.
Size
Lets you specify an amount by which the standard size of the symbols are to be multiplied by. The value 1 represents the standard size used. For example a value of 1.5 would increase the size of the symbol by 50%.
Colour
Lets you specify the colour of the symbol. Select the colour you want to use for the symbols in the graph. When a new colour is selected, the Fill colour will automatically change to match the selected colour. To specify an alternative colour to fill the inner area of a symbol you can then select a colour from the Fill colour button.
Fill colour
If selected, this enables a list of colours from which you can fill the inner area of symbols.
Labels
If selected, this allows points to be labelled within the graph. The labels should be supplied within a factor or a text and can either be selected from the dropdown list or the names can be entered in the space provided.
Font, size and position
This opens the Label Font, Size and Position Options dialog that can be used to specify a font, a size multiplier, position and a bounding box for the labels.
Action buttons
| Run | Produce the graph. |
| Cancel | Close the dialog without further changes. |
| Defaults | Reset options to their default settings. |
Action Icons
| Pin | Controls whether to keep the dialog open when you click Run. When the pin is down |
|
| Restore | Restore names into edit fields and default settings. | |
| Clear | Clear all fields and list boxes. | |
| Help | Open the Help topic for this dialog. |
See also
- Graphics Line and Symbol attributes dialog
- 2D Scatter Plot
- 2D Line Plot
- 3D Scatter Plot
- 1D Density plot
- Scatter Plot Matrix
- Polar Plot
- Spiderweb or Star Plot
- Key tab menu
- PEN directive in command mode
- DGRAPH directive